
Pi Agent Desktop User Guide
Follow these steps to install the app, configure a model, and start your first conversation.
Download and install
Open the download page. The site highlights the package that matches your system. The v0.4.1 desktop packages include Pi Coding Agent 1.2.0 and Herdr v0.8.2. Normal use does not require a separate Pi CLI installation.
macOS
Choose arm64 for Apple Silicon (M-series) or x64 for an Intel Mac. Open the DMG and drag the app to Applications.
Windows
Windows 10 and 11 x64 are supported. The current installer is an unsigned Beta; run the EXE and follow the setup wizard.
Linux
Linux x64 is available as an AppImage. Make it executable, then open it from your file manager or application menu.
Install on macOS
- Download the Apple Silicon or Intel DMG for your Mac.
- Open the DMG and drag Pi Agent Desktop to the Applications folder.
- Open it from Applications. Production builds are signed and notarized by Apple.
Install on Windows
- Download and run the unsigned Windows x64 Beta installer.
- Follow the setup wizard.
- The installer is not code-signed yet. If SmartScreen shows “Unknown publisher,” confirm the file came from GitHub Releases, then choose More info → Run anyway.
Install on Linux
- Download the Linux x64 AppImage.
- Allow the file to run as a program in its properties, or run
chmod +x Pi-Agent-Desktop-*.AppImage. - Open the AppImage. Linux updates are currently manual.
Meet the main workspace
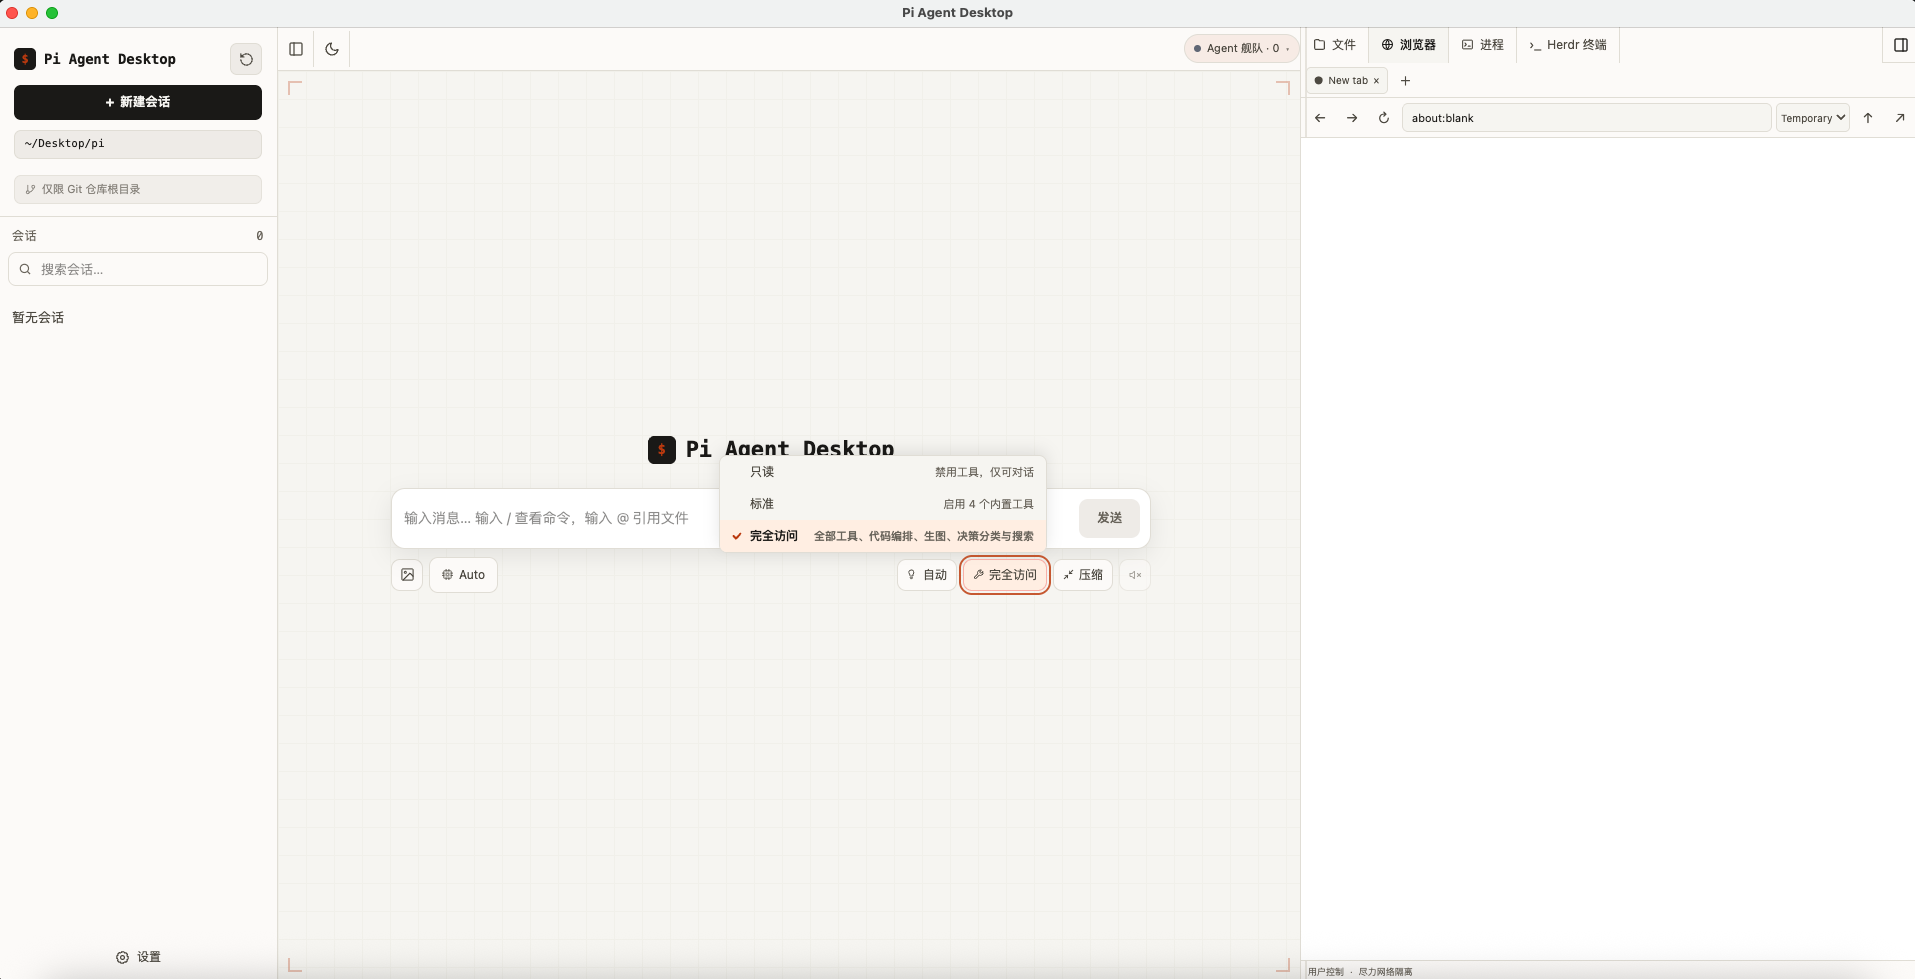
Left: projects and sessions
- Choose or switch the project folder
- Create a new session
- Search, switch, rename, or delete sessions
- Open Settings at the bottom
Center: conversation
- Send prompts and read streaming replies
- Inspect reasoning and tool-call results
- Choose the model, reasoning level, and tool preset
- Drag, paste, or attach any file, or reference project files with
@
Right: files, processes, Herdr, and browser
- Browse files in the current project
- Open several files in tabs
- Preview code, Markdown, diagrams, and documents
- Inspect and control managed processes and redacted logs
- Observe Herdr pane output and take keyboard control when needed
- Open real pages shared with the Agent
- Drag dividers to resize panels
Start your first session
- Choose a project folder in the left sidebar.
- Select New session.
- Make sure an available model is selected below the composer.
- Describe a goal, such as “Explain this project” or “Find the login page.”
For chat or temporary work, you can choose an empty folder. The Agent can read or modify project files only when you authorize the relevant tools.
Auto-titles and returning to the latest message
After the first meaningful message in a new session, the app uses the current model in the background to generate a title of up to 40 characters and updates the sidebar in real time. The request never enters session history or blocks the normal reply; if the model is unavailable, the beginning of the message provides a local fallback.
- Turn Auto-title new sessions off or on under Settings → General → Conversation.
- Manual names always win and are never overwritten by an automatic title.
- Slash commands, blank text, single-character messages, and image-only messages do not trigger a title.
- After scrolling upward, use the floating Scroll to bottom button to return to the latest content and re-enable automatic following during streaming.
Change the interface language
OpenSettings→General→Interface language
Choose English, Simplified Chinese, or Traditional Chinese. Taiwan, Hong Kong, Macau, and zh-Hant system locales default to Traditional Chinese while preserving an existing user choice. Native dialogs, file context menus, browser confirmations, tray copy, and application menus follow the selected language.
Alt to reveal the bar temporarily. macOS continues to use its system menu bar.Adjust chat size, conversation width, and model-reply width
OpenSettings→General→Conversation
- Choose Small, Standard, Large, or Extra Large chat text. Changes apply immediately and persist across restarts.
- Comfortable width stays at 760px; Expanded adapts to the window up to 960px.
- Model reply width controls reply bubbles independently: Comfortable keeps the original reading width, while Fill conversation column lets paragraphs, tables, and code blocks use the available chat-column space.
- Model reply width is separate from the outer conversation width. Full mode contracts with the available space when a right-side panel is open.
- Messages, process details, and the composer share aligned content boundaries in both wide and minimum-width windows.
Configure prompt cache warming
Prompt cache warming offers Off, During long tool runs, and Also while idle modes. It can keep model prompt caches active during long tool calls or idle time, but may use model tokens. The setting is shared with Pi CLI. Reopen any active session that could not update immediately.
Send attachments and use local file links
- Add images or any file through drag and drop, paste, or the attachment button beside the composer. Non-image attachments appear as file cards.
- Large screenshots and Retina PNGs are resized to a 2048-pixel longest edge and roughly 512 KiB JPEG before entering the draft, allowing common screenshots to persist and recover after restart.
- Attachments can be sent without text. Messages with attachments can also enter the Steer / Follow-up queue while the Agent is streaming.
- If sending fails, attachments and text merge back into the current draft without overwriting anything typed while the send was in progress.
- Markdown messages recognize Windows, POSIX, and UNC local paths. Repository-relative paths open inside the app, while absolute paths can be revealed in the system file manager.
- Right-click a local file link to open it, choose the default app or Open with, save a copy, copy its path or text contents, or reveal it in its folder.
- When you type
@to reference a project file, the app browses and searches on demand with up to 300 candidates. In a user-home workspace,AppDataorLibraryis hidden by default but remains accessible when explicitly typed. - If the file-search tool is unavailable, times out, or fails, the UI shows a fallback state and keeps current-directory candidates instead of blocking input or silently returning incomplete results.
Use the built-in browser
OpenRight side of the workspace→Browser
The built-in browser hosts real Chromium pages. You and the Agent operate the same page, with tabs, profiles, and login state preserved, and you can take over at any time.
Browse
- Create, switch, and close multiple tabs
- Choose a temporary or persistent profile
- Sign in and use uploads, downloads, and proxies
Work with the Agent
- Browser read permits navigation, page snapshots, and screenshots
- Browser interact permits clicks, typing, and keyboard actions
- You and the Agent share the page, and you can take over
Permissions and confirmation
- Coding permission never enables browser access automatically
- The main window requests a session grant on first use
- Submissions, uploads, downloads, and external protocols remain policy-controlled
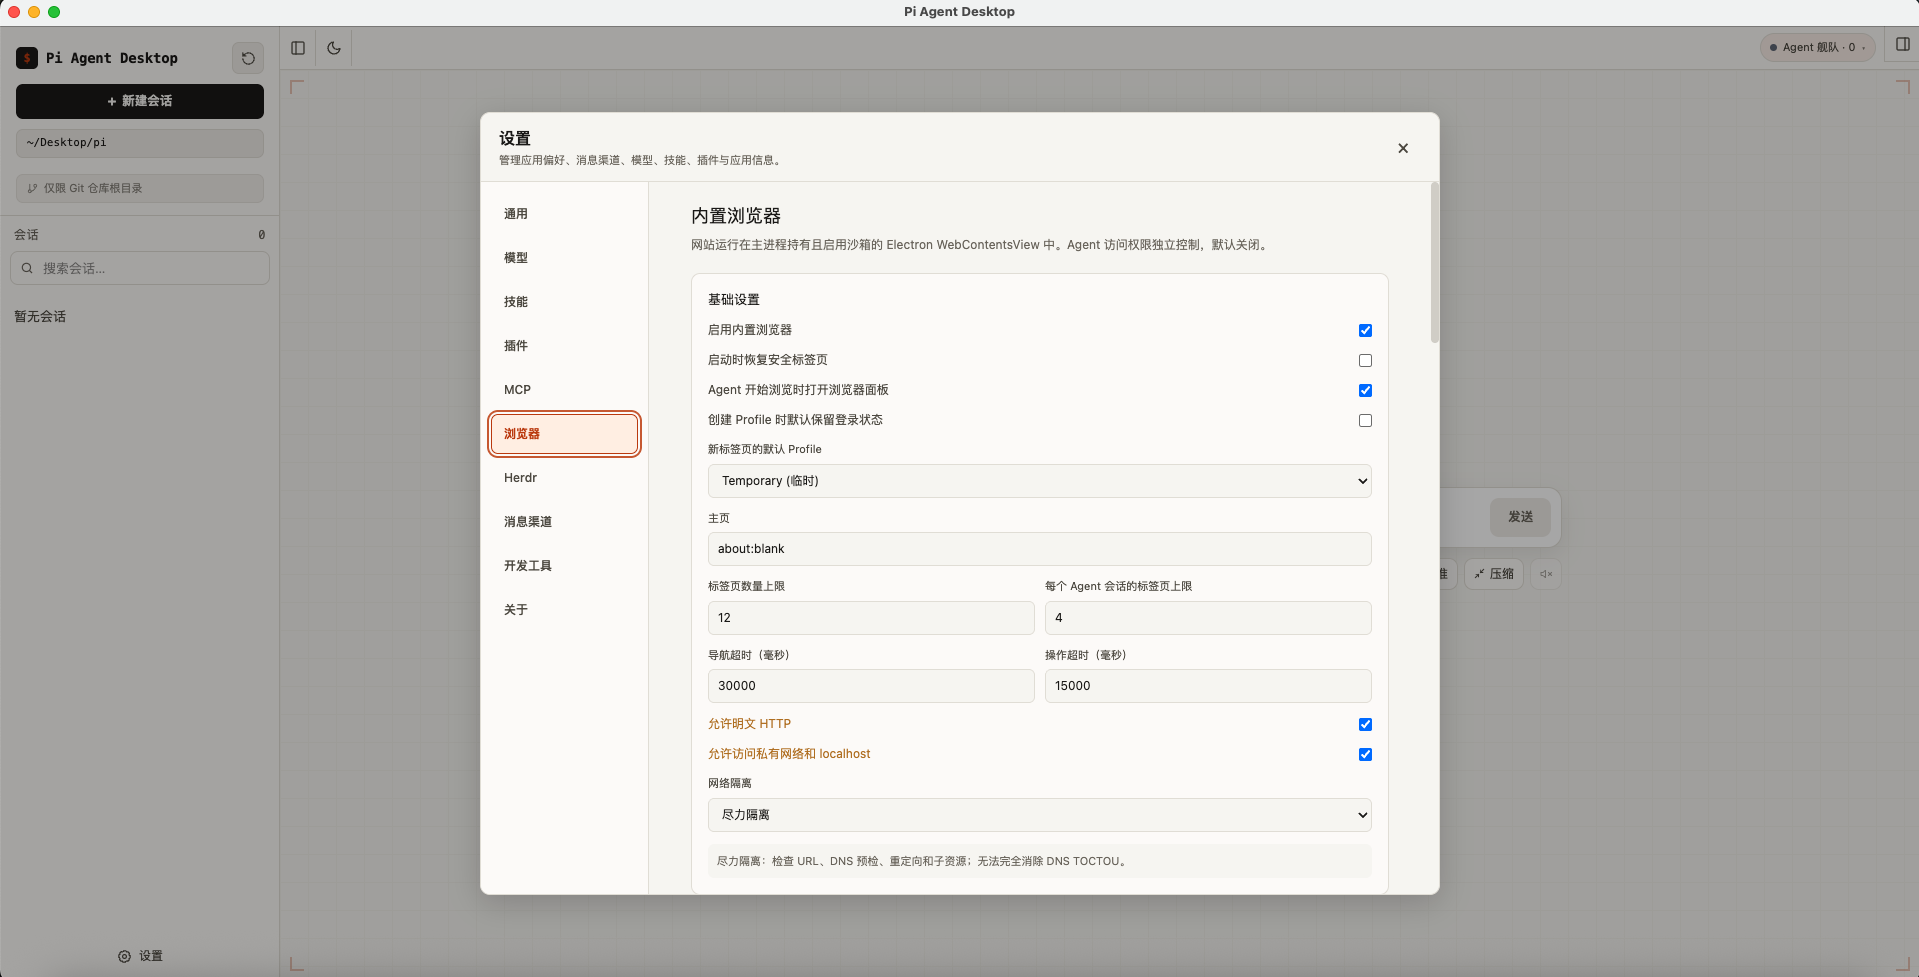
Manage browser permissions
Open Settings → Browser to manage global defaults and persistent policies for individual sessions. Grants from the authorization dialog are temporary for the current session and can be revoked at any time.
Advanced browser mode
Advanced mode adds trusted input, network inspection, a JavaScript knowledge store, and confirmed write-request replay in a dedicated profile. The switch lasts only for the current app launch, and Agent tools never receive or return cookie values.
Use Herdr Agent fleets
OpenSettings→Herdr
Pi Agent Desktop uses Herdr v0.8.2 / protocol 20 to manage local Agent fleets. Pi can use herdr_* tools from the original conversation, while the title bar shows Fleet status and the right-side Herdr terminal supports observation, troubleshooting, and explicit takeover.
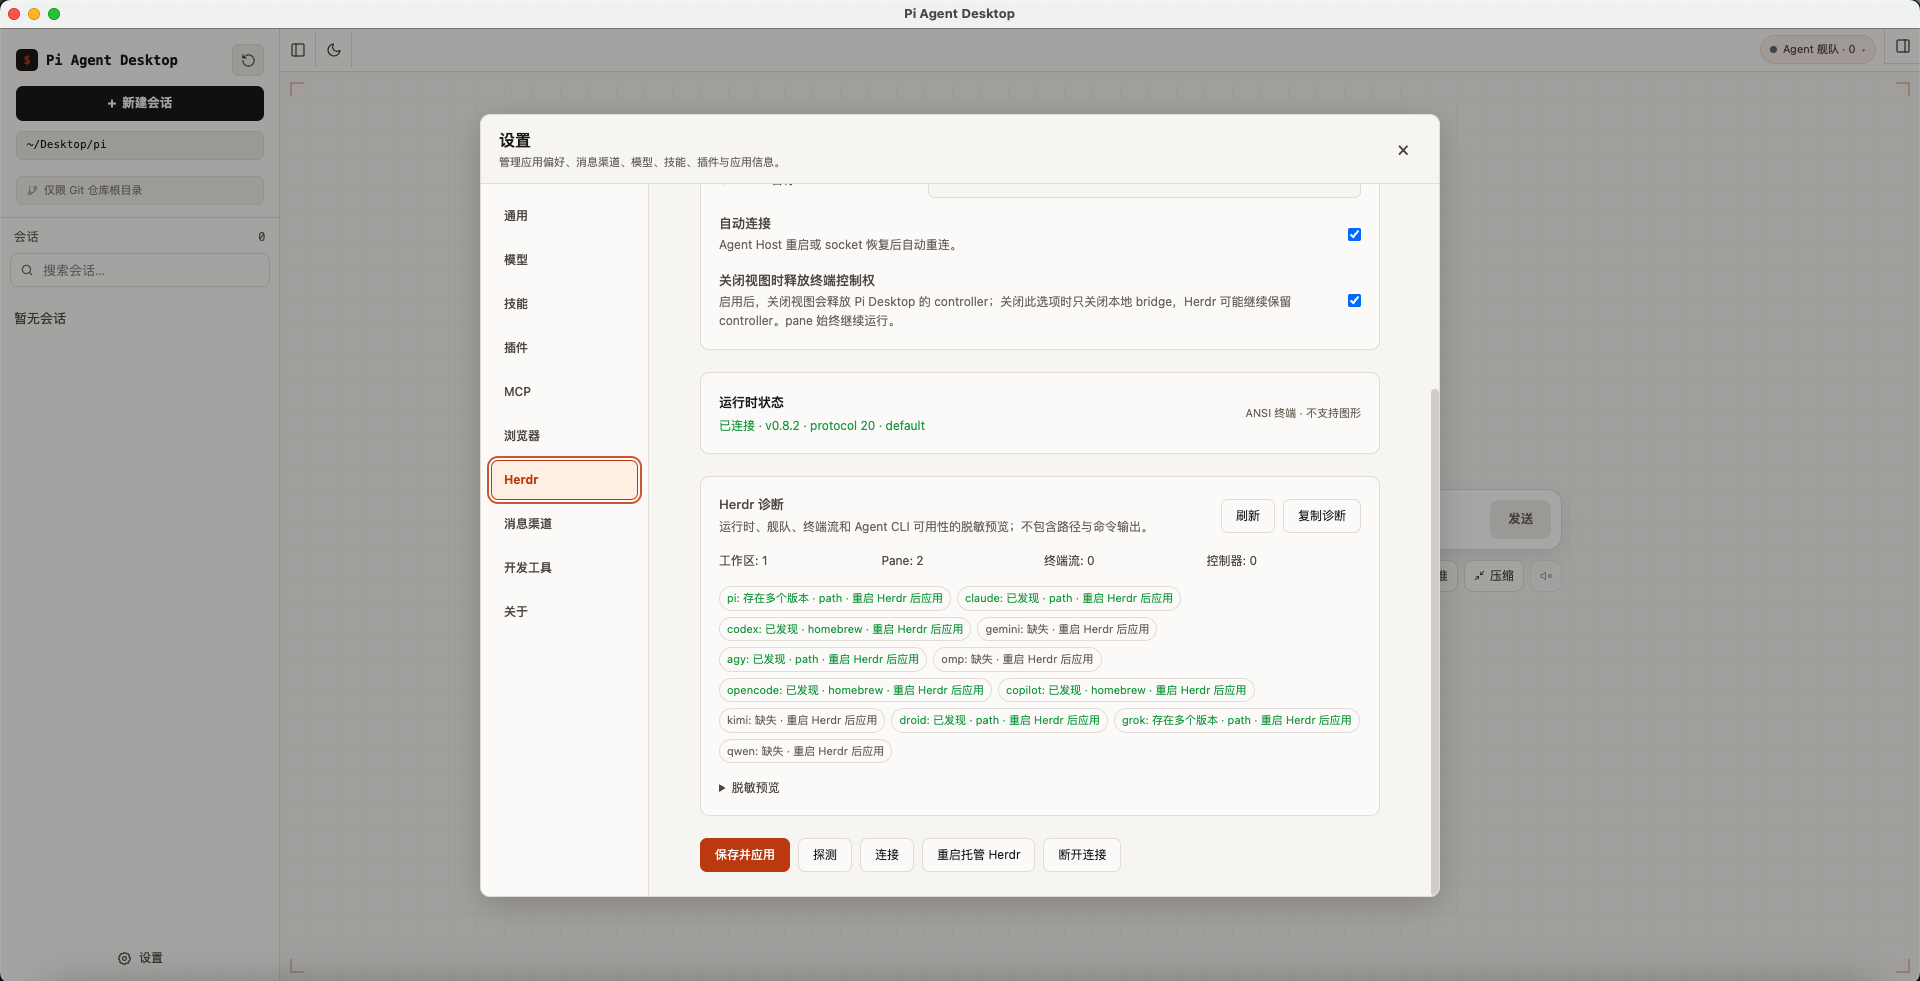
Prepare the Herdr runtime
- On macOS, Linux, or Windows x64, open Settings → Developer Tools and find Herdr. An integrity-verified v0.8.2 runtime is bundled, so you can install, update, repair, or remove the private runtime without a separate network download.
- Open Settings → Herdr, enable the integration, choose Attach or Managed mode, enter a Herdr Session name, and optionally enable automatic connection.
- Attach connects to a system Herdr server that you start and stop yourself; Pi Desktop never stops it. Managed starts, monitors, and restarts Pi Desktop's private server within limits.
- Managed stops its private server when Herdr is disabled, the mode changes, the runtime is removed, or the app exits. It never takes over or terminates an external Herdr.
Manage Agents from the conversation
- Twenty-four
herdr_*tools cover Fleet queries, workspace / tab / pane creation and management, Agent launch and prompting, waits, key input, state explanation, process diagnostics, and output waits. - Title-bar status is grouped by workspace, tab, pane, and Agent, showing idle, working, blocked, done, or unknown states on both the start screen and active sessions.
- Supported Agent CLIs include
pi,claude,codex,gemini,omp,opencode,copilot,kimi,droid,grok,qwen, andagy. - Managed mode discovers common Agent CLIs only in fixed allowlisted locations and places only permitted Agent commands in the launcher overlay. It never runs a login shell, reads shell profiles, installs from the network, or recursively scans the home directory.
missing-locallymeans only that Desktop did not find the CLI in a supported local directory. In Attach mode, the external Herdr Session still returns the authoritative launch result.- Pi Sessions and Herdr Sessions are independent. Herdr prompts are not written to Pi session history or compaction summaries.
Observe and take over a terminal
- The right-side Herdr terminal supports ANSI output, auto-fit sizing, read-only observation, explicit keyboard takeover, input throttling, reconnection, and bounded buffering.
- Closing the terminal view does not close the Herdr pane or Agent. You can choose whether closing the view releases terminal control.
- Closing a workspace, pane, or Agent requires local confirmation. Herdr v0.8.2 cannot stop only an Agent, so Close Agent explicitly closes its pane and every process inside it.
- On Windows x64, native Job Objects contain terminal child processes and provide bounded cleanup after app or terminal failure.
Run managed background processes
EnableSettings→General→Managed processes
Managed background processes let the Agent keep development servers, watchers, mock APIs, and other project tasks running under the app's lifecycle control without shell &, nohup, or an external terminal. Short commands use the session’s selected shell: Bash or, on Windows, PowerShell.
Start and inspect a process
- Choose a trusted project folder, then turn on Enable managed background processes under Settings → General. The feature is off by default.
- Ask the Agent to start a development server, watch build, or another long-running task; it uses the
process_*tools. - Open Processes on the right to inspect owner, state, readiness, redacted logs, loopback endpoints, and exit reasons.
- Select Open in Browser for an available endpoint to debug it with the built-in Browser. Process capability and Browser authorization remain separate.
Control processes and logs
- Send line-oriented stdin, stop, force stop, or restart a process, and search, copy, or export its logs.
- Slow-starting tasks continue from a log cursor instead of rereading all output. Logs use bounded buffers and redact common secrets.
- Each process belongs only to the Agent session that started it. Restarts create a new run ID, and stale operations are rejected.
- An Agent cannot automatically bypass a user stop. A crash reaper performs bounded process-tree cleanup after Host or app failure.
127.0.0.1 by default; common LAN binds require confirmation.Windows PowerShell support
Use PowerShell 5.1 or 7 for Agent commands on Windows. Choose the default shell for new sessions while existing sessions keep their current shell.
- On Windows, open Settings → General → Default Agent shell and choose PowerShell or Bash. New sessions default to PowerShell; this setting only affects newly created sessions.
- PowerShell 7 is preferred when available; Windows PowerShell 5.1 is also supported. In Developer Tools, select an executable if needed and refresh tool status after installing or changing its path.
Split very long PowerShell commands. Commands over the Windows length limit are rejected before execution rather than silently truncated.
Configure models
OpenSettings→Models
Pi Agent Desktop v0.4.1 includes Pi Coding Agent 1.2.0 but does not include model credits. Connect an existing model provider account or enter an API key from your provider. Model settings support English, Simplified Chinese, and Traditional Chinese.
Use an API key
- Open Settings → Models and select Add provider.
- Choose your model provider.
- For a proxy or compatible endpoint, enter a Base URL; leave it blank to use the provider default.
- Paste the API key and save. The app synchronizes the Agent Host model state.
- Select a model. If a Test action is available, use it to verify the connection.
- Close Settings and choose the model below the conversation composer.
The Base URL overrides the endpoint for the current API-key provider and takes effect with the API key after you select Save at the bottom of the page. Model catalog refresh is fully timeout-bounded: even if service creation or final catalog projection stalls, the app stops waiting and preserves the cached models.
Control which models appear
- Open Settings → Models and choose a connected subscription or API-key provider.
- Review the enabled count. When a provider has many models, search by model name or ID.
- Toggle models individually, or use Enable all and Disable all for the provider.
- Wait for the selection to save, then return to the conversation model selector.
The selection persists to Pi settings and remains compatible with existing thinking-level configuration, but it does not change the model currently used by an existing session. The app prevents a configuration with no valid models from being saved.
Refresh the model directory
- Open the model selector below the conversation composer.
- Select Refresh model directory to fetch the latest models from configured providers.
- Wait for the refresh to finish. Offline, timeout, and partial-provider failures appear as a status or warning.
Sessions prefer the locally cached model directory on startup instead of making an unnecessary network request. A failed refresh never clears existing models, so the cached directory remains available.
Use OAuth
- Choose a provider that supports OAuth.
- Select Sign in and complete authorization in your browser.
- Return to the app and confirm the provider shows as connected. Signing in or out automatically synchronizes the model state.
Use a compatible custom service
For self-hosted services compatible with the OpenAI, Anthropic, or Google API, add a custom provider and enter its Base URL, API type, API key, and model information. Use this only when a standard provider does not meet your needs.
Recover model configuration
- Open Settings → Models and fix the reported fields. For fields that cannot be edited there, edit ~/.pi/agent/models.json manually. Line comments and trailing commas are supported.
- Reload the configuration from disk, then reload the session before sending again. Review the selected model and Auto routing after recovery.
OpenRouter refreshes its model directory using the current account's permissions. Desktop and Pi CLI share the cache in ~/.pi/agent/; after changing accounts or starting offline, reconnect and refresh to replace a stale or different account's catalog.
Auto model routing
Choose a fast model and a capable model. Auto routes each new request by thinking level or task complexity, and shows which model actually answered.
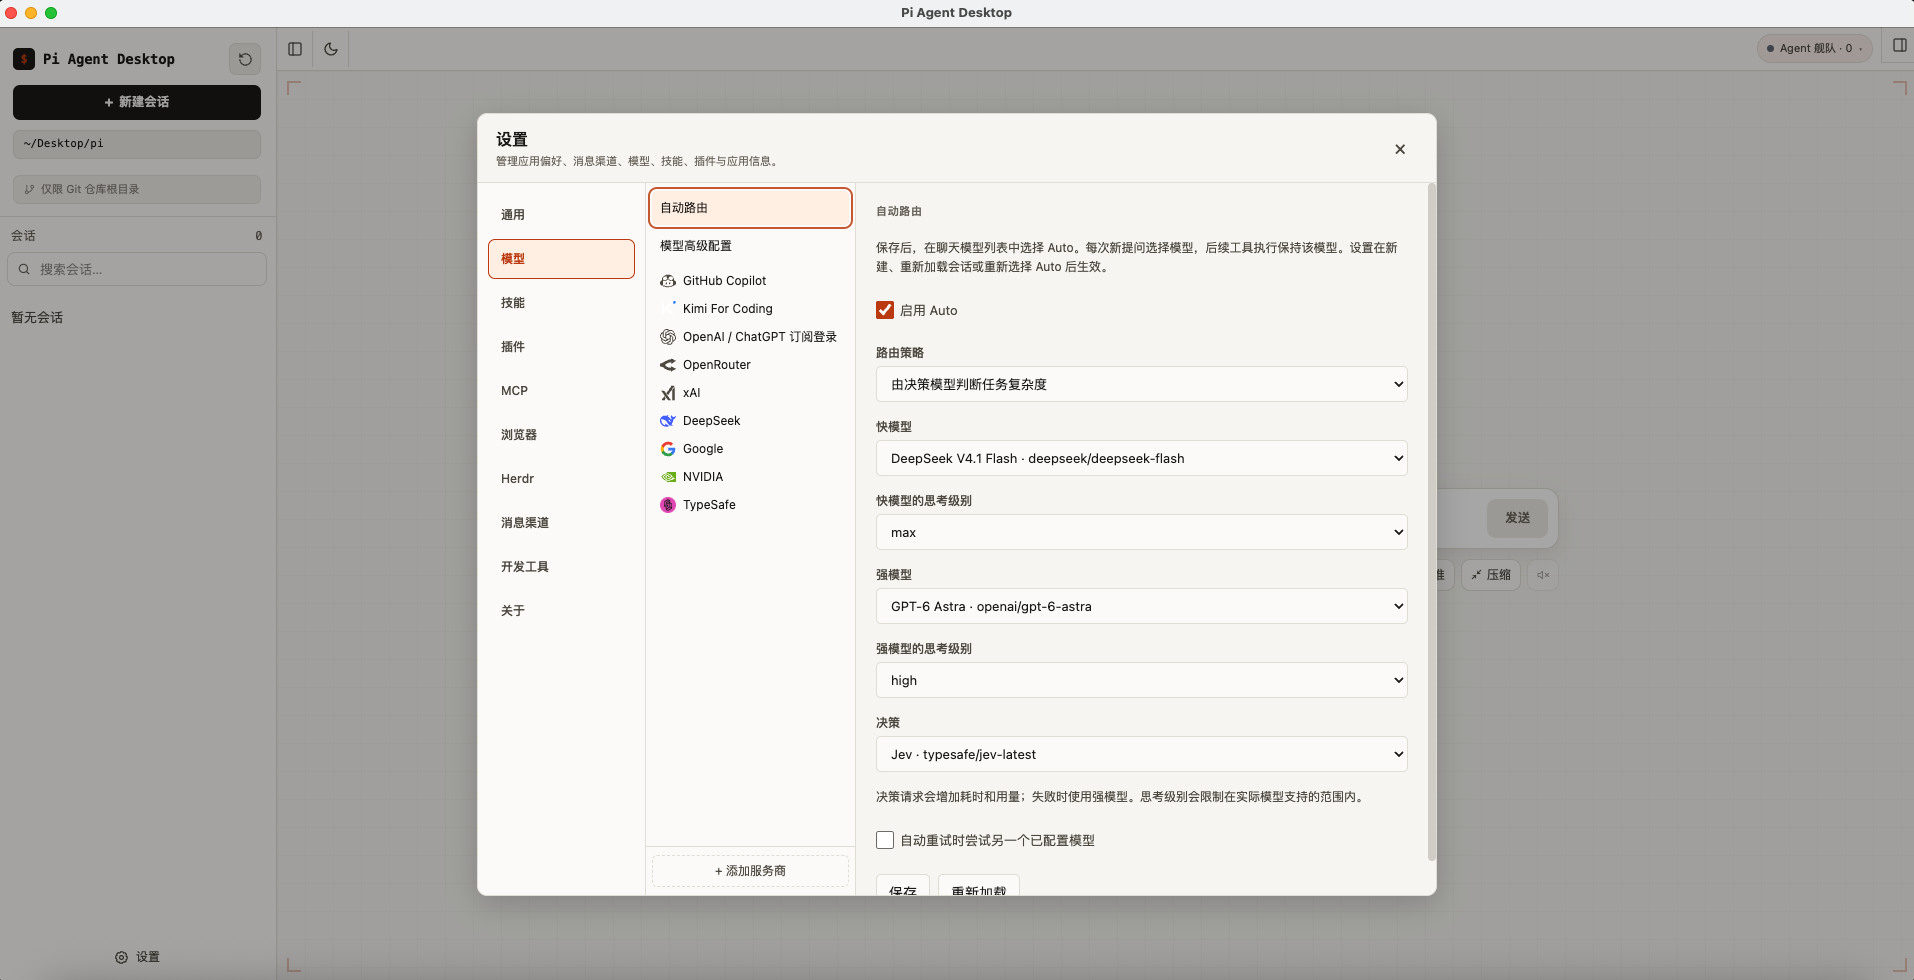
- Open Settings → Models → Auto routing. Enable Auto, choose both models and their thinking levels, then save and select Auto below the composer.
- Route by thinking level, or add a decision model to judge task complexity. Decision requests add latency and usage; if a decision fails, Auto uses the capable model.
- Tool continuations keep the selected model. You can enable trying the other configured model on an automatic retry and inspect usage by actual model.
- Routing changes apply to new or reloaded sessions, or after selecting Auto again.
MCP services
Connect local and remote tools with stdio or Streamable HTTP. Import configurations, sign in with OAuth, test connections, and preview resources in Settings.
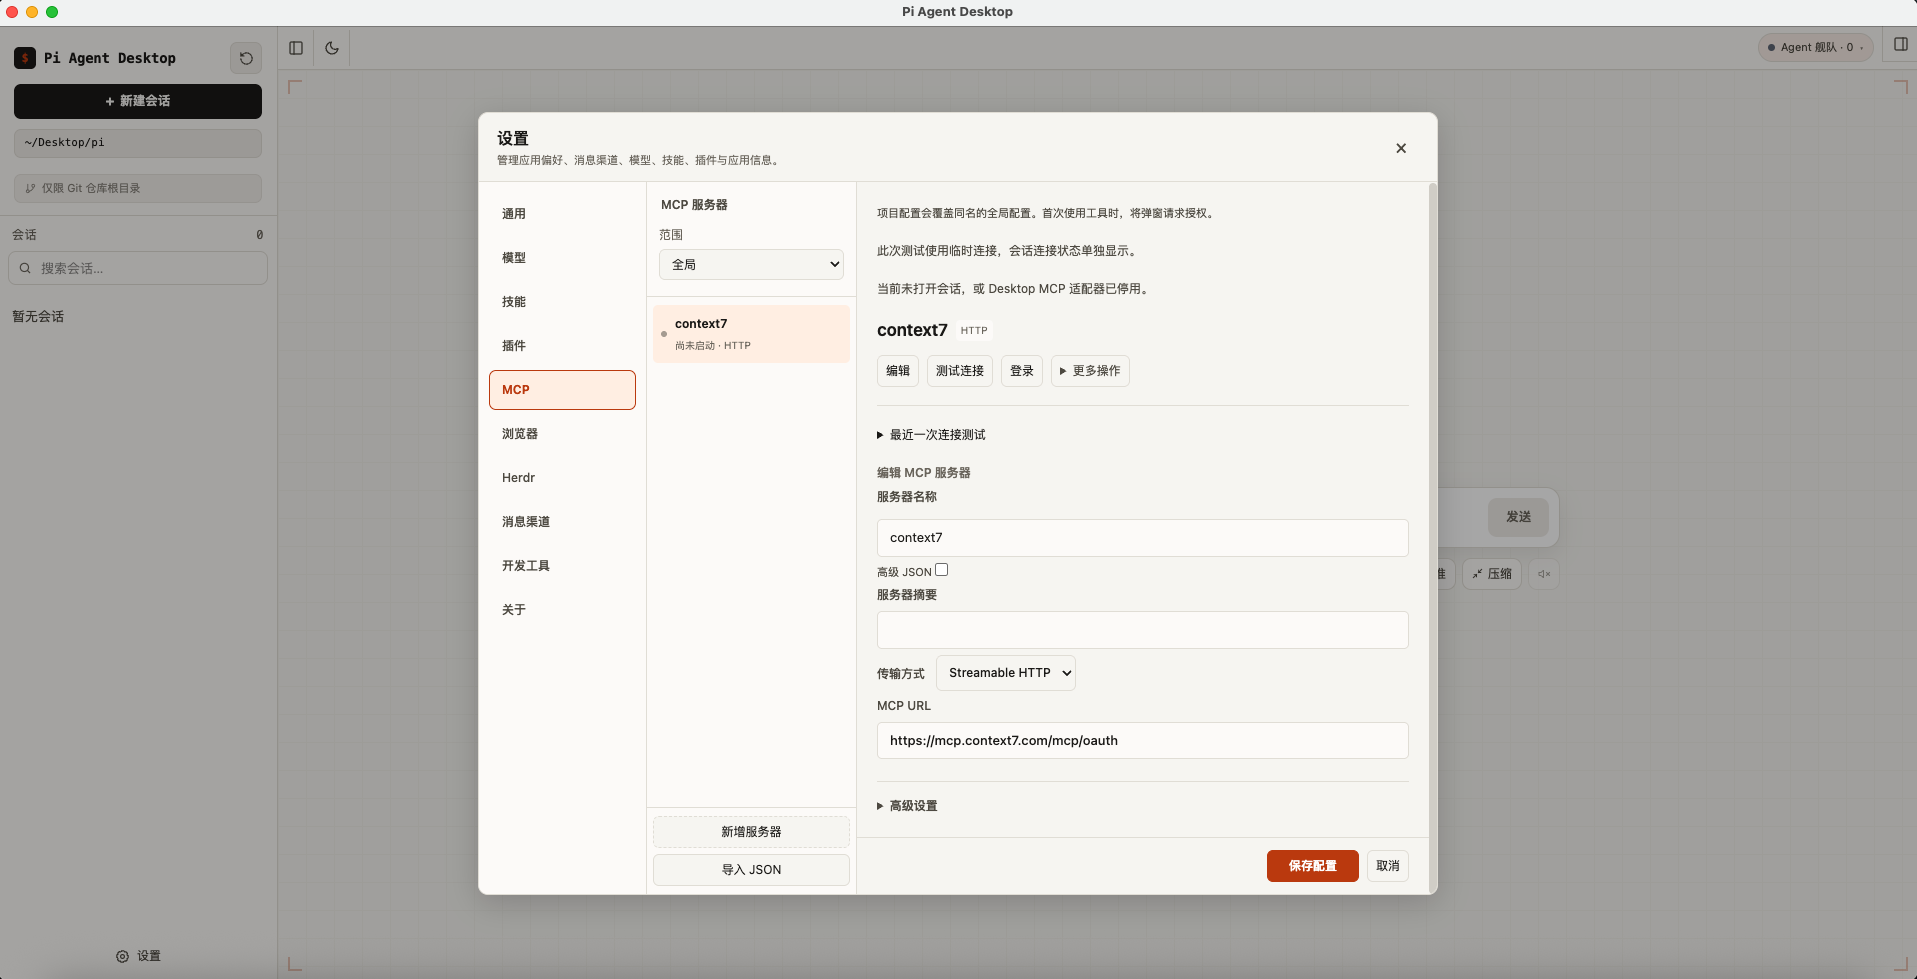
- Open Settings → MCP. Choose Global or Current project, then add a server or import its JSON configuration.
- Configure the stdio command or Streamable HTTP URL. Use OAuth or a provider credential reference when required, then test the connection.
- Browse tools, resources, and resource templates; preview resource content or reconnect a service from its details.
- Project entries override global entries with the same name. Extension sources and pending changes are displayed separately.
- Saving an MCP configuration does not authorize its tools. Grant access in the current session's tools menu; nested calls follow the same permissions.
Image generation and decisions
Use Codemode to generate images, classify content, answer yes/no questions, or score results. Generated images stay available when you reopen the conversation.
- Configure an available image or decision model in Settings → Models, then enable Codemode in the session tools menu. Full access includes Codemode and tool search.
- Ask the Agent to generate an image or classify content. Image-capable decision models can also judge screenshots. These are auxiliary models, separate from the chat model picker.
- OpenAI decisions require an API key; ChatGPT subscription sign-in does not provide this capability. Add TypeSafe / Jev with its API key to use jev-latest.
- Provider details offer image and decision model tests, which may incur charges. Calls support cancellation and keep their inputs, results, state, and usage in session history.
Tools and execution history
Follow direct and nested tool calls in a branch-aware execution tree. Inspect status, duration, inputs, and full results, even after reopening or compacting a session.
- The session tools menu controls model-visible entry points, tools available for nested discovery, and execution grants separately. Authorization changes sync to the runtime.
- Large results and temporary output are saved for paginated reading. The Agent can retrieve original content with tool_history_get after reopening or compaction.
- After an interruption, completed child calls are retained and unconfirmed results are marked interrupted or unknown. Recovery does not automatically replay operations.
Advanced model settings
- Open Settings → Models → Advanced model settings to adjust automatic context compaction, reply token reserves, retained recent content, and per-model overrides.
- Configure Agent and provider retries, wait times, request timeouts, and automatic, SSE, WebSocket, or cached WebSocket transport.
- Model editing adds sampling parameters by thinking level, image and request input limits, and model ID overrides. Max reasoning is available on supported models.
- Advanced settings are shared with Pi CLI. Reload existing sessions to apply them; trusted project settings may override global values. Saving detects external edits to reduce conflicts.
Skills settings
OpenChoose a project→Settings→Skills
This section focuses on settings. Each Skill's own documentation explains its capabilities and usage.
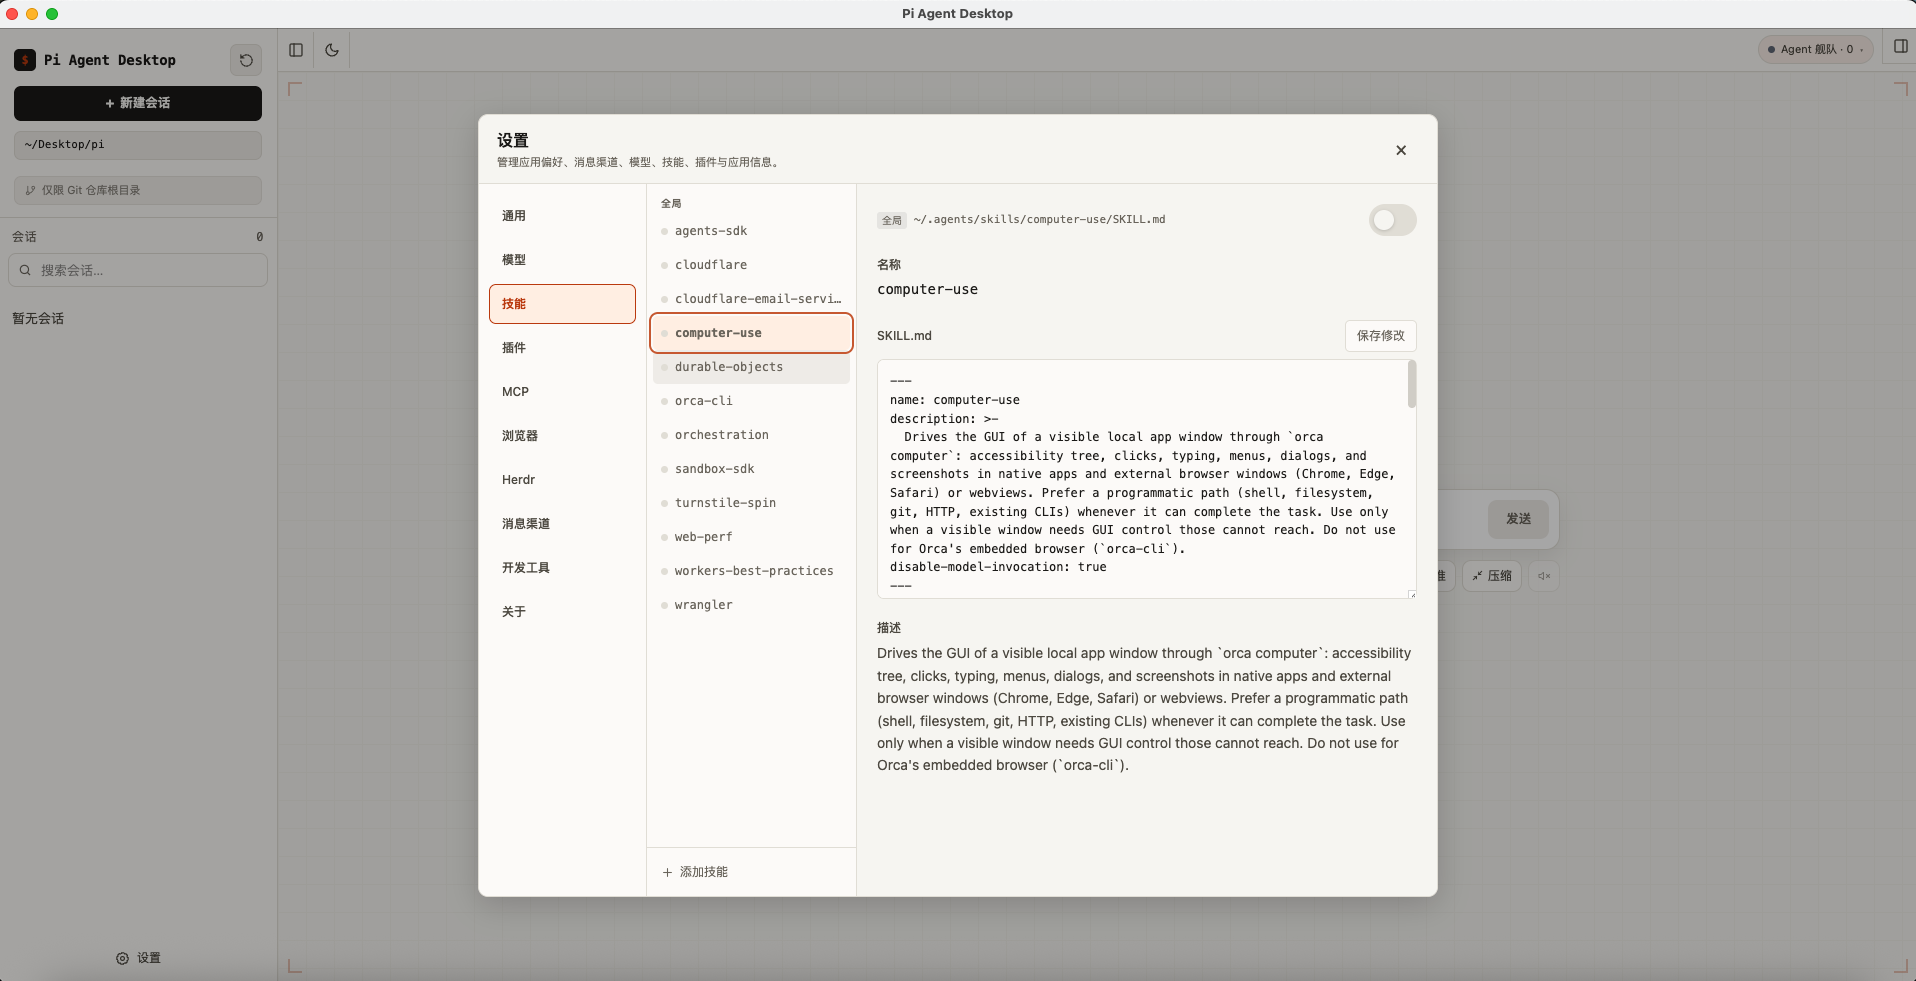
- Choose a project, then open Settings → Skills.
- Select an installed Skill and use the switch to control whether it is visible to the model.
- To add one, select Add skill, search by name, choose Global or Current project, and install.
- Edit the content only when you need custom instructions, then save your changes.
Plugins settings
OpenChoose a project→Settings→Plugins
The Plugins page lets you configure a source, installation scope, and enabled state.
- Choose a project, then open Settings → Plugins.
- Select Add plugin and enter an npm package, Git repository, or absolute local path.
- Choose Global or Current project, then install.
- Enable, disable, update, or remove Plugins from the installed list.
- After changing Plugin settings, reload the current session.
Messaging channel settings
OpenSettings→Messaging channels
Choose a channel. The official QR creation flow is recommended for Feishu / Lark, while existing custom apps remain supported:
Attachments stay with the correct turn. Cancelled or extension-handled messages no longer affect later Desktop turns or resend the previous assistant reply.
| Channel | Configuration |
|---|---|
| Select Connect WeChat, then scan the QR code and confirm on your phone. | |
| Telegram | Enter the Bot Token created with BotFather. |
| Feishu / Lark | Create a new bot through the recommended QR flow, or enter the App ID and App Secret for an existing app. |
Create a Feishu / Lark bot by QR code
- Select Connect Feishu / Lark, then choose Scan to create (recommended).
- Select Feishu China or Lark for the account region.
- Generate the QR code, scan it in the corresponding client, and complete official authorization.
- The app creates the bot, configures required permissions, stores the credentials, verifies the identity, and starts the connection.
Connect an existing Feishu / Lark app
Choose Existing app, select Feishu or Lark, then enter the App ID and App Secret. The QR flow never reads an existing app's App Secret.
Finish the account setup
- Save the account and configure its default project directory and access policy as needed.
- Start the account and confirm its status is Running.
- Use Test connection. Bind a messaging conversation only when it should share context with the current desktop session.
Developer tools settings
OpenSettings→Developer Tools
The app scans required tools automatically. Most users only need to act on items marked Missing or Unavailable.
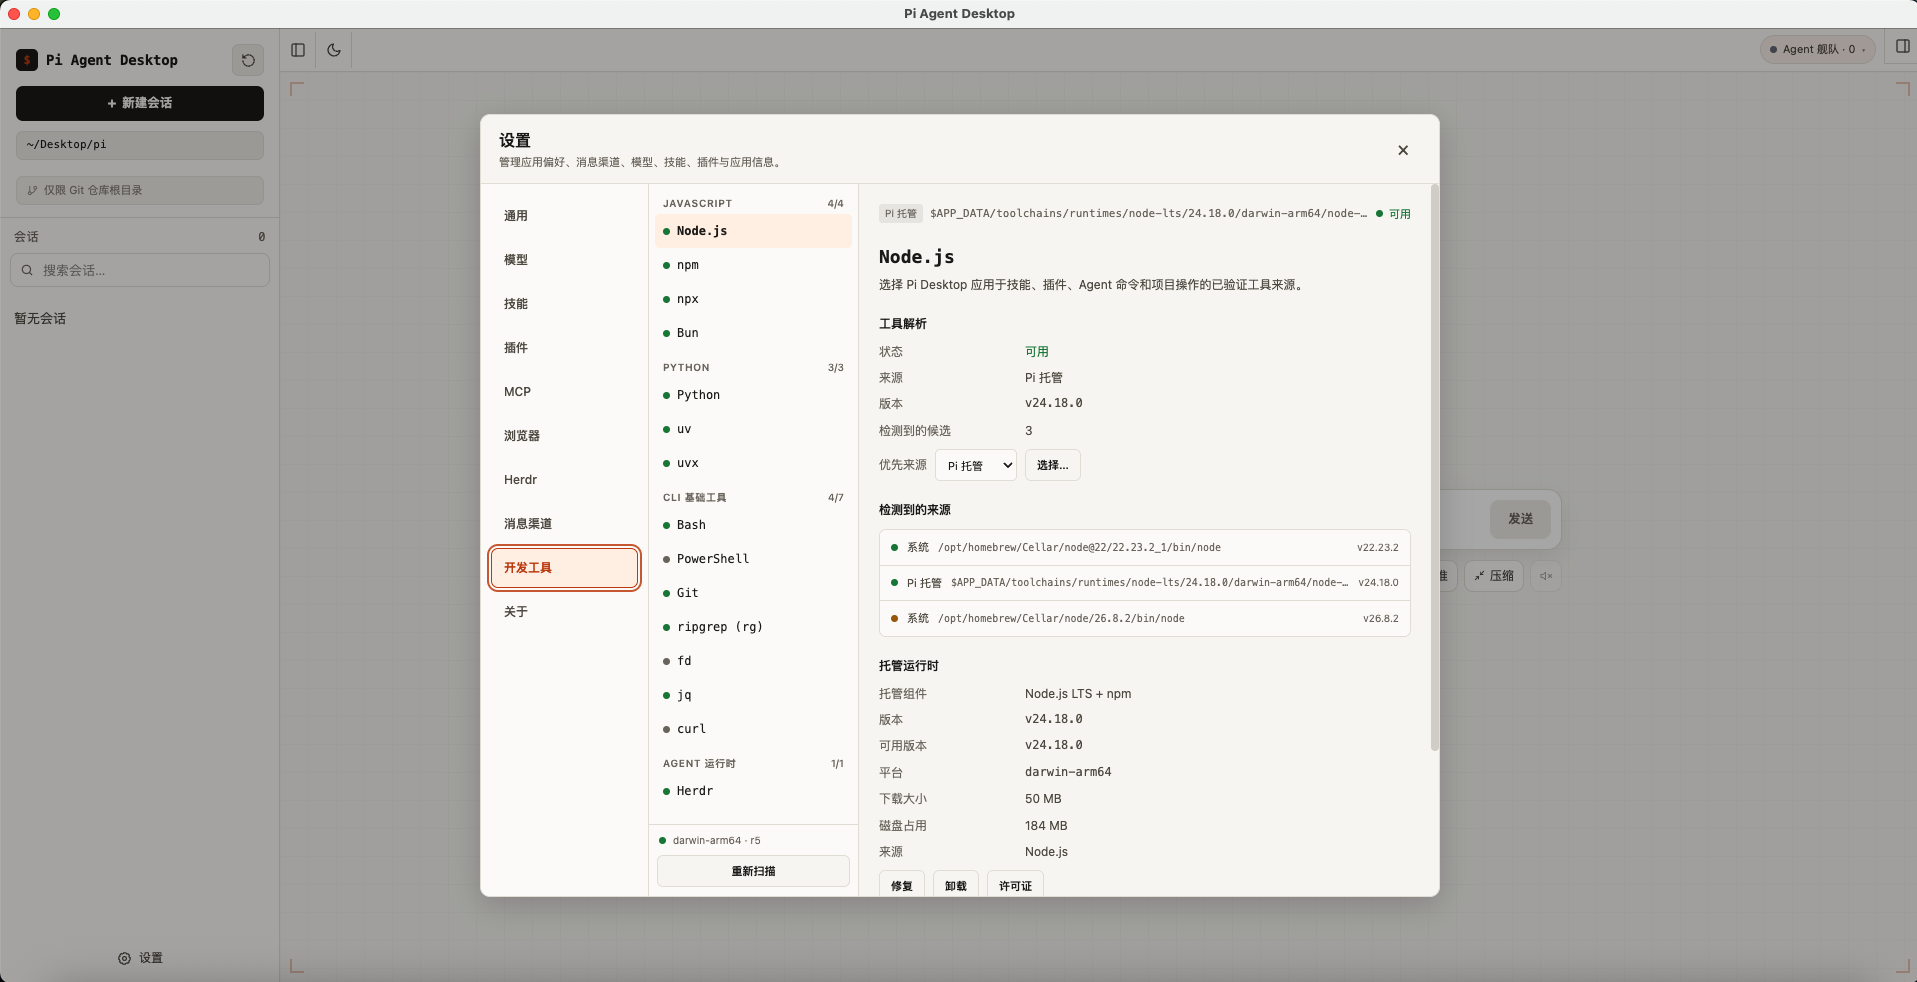
- Select Rescan to see each tool's status, source, and version.
- Leave installed tools on Auto. If detection is wrong, use Choose to select a path.
- When a managed version is available for a missing tool, select Install. Use Repair if managed files are damaged.
On Windows, Git Bash is recognized from its installation layout together with the colocated Git version, so custom Git for Windows directories and versioned PortableGit folders work correctly.
PowerShell 7 is preferred when available; Windows PowerShell 5.1 is also supported. In Developer Tools, select an executable if needed and refresh tool status after installing or changing its path.
Manage the Herdr runtime
macOS, Linux, and Windows x64 packages include integrity-verified Herdr v0.8.2. Developer Tools shows the bundled and installed versions plus private disk usage, and lets you install, update, repair, or remove the private runtime from the bundled copy without downloading Herdr separately.
Herdr versions arrive with Pi Desktop updates. Removing the private runtime does not delete Herdr Sessions or the recovery copy bundled inside the app.
Updates, background operation, and local data
Check for updates
Open Settings → About to check for stable releases. macOS and Windows can download and install updates in the app. Linux AppImage users currently download new versions manually.
Keep messaging channels online
Enable Minimize to tray when closing in Settings → General. Closing the main window then keeps channels running; choosing Quit from the tray fully stops the app.
Local data
Desktop tool permissions and execution records live in the application data directory. For a complete backup, keep its tool-executions logs and content files alongside ~/.pi/agent/.
- Sessions and Pi configuration are stored locally in
~/.pi/agent/by default. - Existing Pi CLI users can reuse their current sessions and configuration.
- Model requests still go to your selected model provider, so review that provider's privacy policy.
- Messaging credentials are encrypted with the operating system's secure storage and are never displayed again in Settings.
Frequently asked questions
Why can’t the Agent use a configured MCP tool?
Saving an MCP configuration does not authorize its tools. Grant access in the current session's tools menu; nested calls follow the same permissions.
How do I enable Auto?
Open Settings → Models → Auto routing. Enable Auto, choose both models and their thinking levels, then save and select Auto below the composer.
Do I need to install Node.js or Pi CLI?
No. Desktop packages include the Pi Coding Agent runtime. Check Settings → Developer Tools only when a Skill, Plugin, or Agent command requires an additional tool.
Why do Skills and Plugins ask me to choose a project first?
Skills and Plugins can be installed per project, so the app needs the current project folder. Choose one in the main sidebar, then reopen Settings.
Why can’t I send a message after configuring a model?
Confirm a model is selected below the composer, then check the API key, account credits, and network connection. Use Test on the provider card to see the exact error.
Why do I only see recent messages when opening a long session?
To shorten initial loading, the app starts with the most recent 20 conversation turns. Scroll upward or select Load earlier messages to continue. Pagination and deferred content never delete or truncate locally stored history.
Why can’t the Agent use the browser after I approved Coding tools?
Browser reading and interaction use separate grants. Coding permission does not implicitly enable Browser read / interact. Confirm the main-window authorization dialog or adjust the policy in Settings → Browser.
Why can’t I enable managed background processes?
Confirm that the platform is supported and a trusted project folder is selected. Windows requires Windows 11 x64. If the UI reports a helper, owner-identity, or crash-reaper problem, follow its restart or reinstall guidance and export diagnostics when needed.
Why can’t I find or connect to Herdr?
Herdr supports macOS arm64 / x64, Linux x64, and Windows x64. Windows ARM64, Windows Server, and 32-bit Windows are not supported. Install or repair bundled Herdr v0.8.2 under Settings → Developer Tools, then check the mode, Session name, and connection status under Settings → Herdr.
Why is the top menu bar missing on Windows or Linux?
v0.2.3 hides the top menu bar by default for a more integrated app surface; commands and shortcuts are unchanged. Press Alt to reveal it temporarily. The macOS menu bar remains at the top of the system screen.
Why is there no reply after approving channel pairing?
The first message triggers pairing and is not sent to the Agent. After approval, ask the same user to send a new message.
Why does a messaging channel go offline when I close the window?
Enable Minimize to tray when closing in Settings → General. Choosing Quit from the tray or application menu stops all channels.
What should I do when Windows SmartScreen appears?
The Windows installer is not code-signed yet. Confirm it came from GitHub Releases, then select More info → Run anyway.
Is Linux supported?
Yes, on Linux x64 through AppImage. Linux ARM64 builds are not available yet, and AppImage updates are currently manual.
How do I report a problem?
Record the app version, operating system, and error message, then open a GitHub Issue. Never include API keys, tokens, app secrets, or other credentials.